Art Activity Video: Marionette Puppets
Create a puppet inspired by animatronics!
Activity best for children age 4 and up
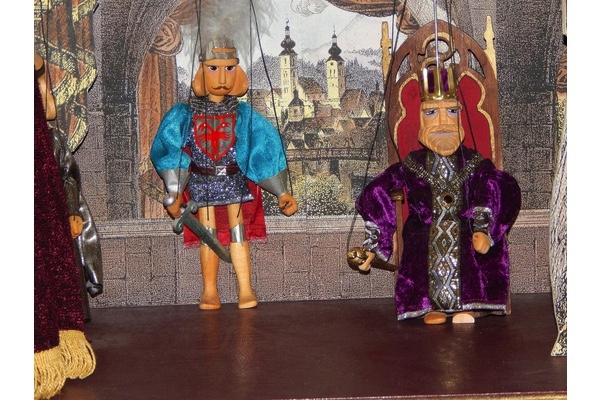
Have you ever played with a puppet? If you have, how did you use it? Did you make it fly like a bird or bark like a dog? Puppets are a great way to use our imagination to make a world of creatures and their adventures. Puppets that are made to move by way of strings tied to a rods above it, are called marionettes. Marionettes have been used around the world for hundreds of years.
Centuries later, a robot dog by the name of “Sparko” delighted people at the 1939 World Fair, along with his “owner,” “Elektro the Robot.” By the early 1960’s, Walt Disney began to use Audio Animatronics in his Disneyland theme park as tropical birds singing in the Tiki Tiki Room and as an animatronic Abraham Lincoln speaking to the crowd in The Hall of Presidents. Walt Disney Imagineers have made animatronics now for many years that appear in their theme parks, movies and restaurants. Now, animatronics can interact with you through AI, or artificial intelligence, making them feel even more real and fun for us.
Robots have evolved into any useful device powered by mechanics and computer programs, while animatronics combine puppetry and mechanical motion to animate figures primarily to entertain us–just like marionettes did hundreds of years ago!
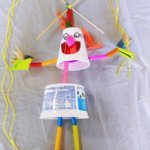
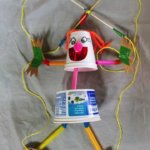
Today we are going to make a Marionette using things we have at home in our recycle bin and craft cabinet! Let’s think of what we want our Marionette to do and how it needs to move, just as if we are designing an animatronic to entertain us and our family.
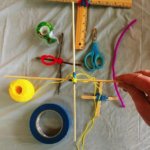
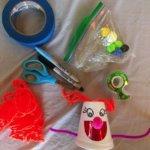
Materials you’ll need:
2 paper or styrofoam cups
Hole punch
Easy to thread string or yarn
Milkshake straws
Two bamboo skewers, popsicle sticks, rulers, or sticks from backyard
Tape and a glue stick
Scissors
Markers
Foil and other materials for decorating marionette
Beads made from cut milkshake straws, large wood, plastic beads, or rigatoni pasta (For smaller children, be sure to use larger beads!)
Directions
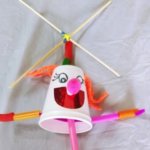
STEP 1
Make the Crossbar. Marionettes are operated by a crossbar. String is connected to it to make the puppet move arms and legs. Use tape to secure two sticks in the shape of a “t” to form the crossbar. Wrap a pipe cleaner around the center to make it sturdy for play.
STEP 2
Prepare two cups for stringing. Poke a hole into the top of your cup large enough to string or yarn through, but small enough to stop a bead from pulling through. About an ⅛” hole is just right. Do this with each of the two cups.

STEP 3
Prepare one cup to be the head. You will be making “armholes” in this step. Punch out two holes above the lip of the container on the open end.
Hint: You can use a pipe cleaner to thread through one hole and determine where it should come out the other side first. The goal is to create a place for the children to thread through a pipe cleaner with beads to make arms.
(Shown in Step 4)
I threaded the pipe cleaner for arms and left it there for the next step. I think it will help orient the kids to where the rest of the features go next.

STEP 4
Decorate the Head and Body.
Hint: I love to use water based markers whenever I can, but on materials like styrofoam cups Sharpies work best. If you don’t have Sharpies, let the kids draw on a piece of paper with whatever markers or crayons they have. Cut out the parts and paste them on the cup with a glue stick.
STEP 5
Thread head and arms with beads. Use both of the two strings hanging from the crossbar to thread a few inches of beads.
Hint: You can pass the string through a hairpin to create an easy threading tool for the children.
Now string the head. A longer section of beading is done from the inside of the cup past the arms to clear the open lip of the cup. This creates a neck/mid-section. String sections of beads from both arms too, leaving enough pipe cleaner to turn the ends of the pipe cleaner over the top of beads to keep them from slipping off the pipe cleaner.
STEP 6
String the lower body and legs. Using your second cup or recyclable, push the two threads through the hole punched through in Step 2. Now make the legs! Split the two threads apart and using long sections of milkshake straws or beads to make your two legs. Pull each leg beads tight against the inside of the cup so the middle section stays in place.
Hint: You can use tape to fix the string in place so the beads don’t slip off.

STEP 7
Hole punch hands and feet to string on the marionette. Secure the feet and hands on with tape. Clip off the extra string!
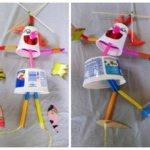
STEP 8
Stringing the Marionette (part 1). Lay the puppet down with the crossbars making an “x” to either side of the head as shown in the picture on the right. Take four sections of string and lay two to either side of the top of the “x.” Cut the strings so they are the same length and reach to the bottom of the hands and feet. The leg sections of string will be much longer than the sections that go to the hands.
STEP 9
Stringing the Marionette (part 2).
Hint: I used green and blue tape to show how legs and feet are strung.
Tape a shorter string to a hand. Tape the other end of the string to a crossbar. Take the other shorter string and tape the other hand. Tape that string with a hand to the other side of the SAME crossbar. On the remaining crossbar, tape a string to a foot. Tape the top of the string to the crossbar. Repeat with the other foot.
STEP 10
Now put on a puppet show!
Explore marionettes from around the world –past and present!


Share your puppets with us on Instagram by tagging @sdcdm320!
Questions about this activity? Email education@sdcdm.org