Daily STREAM Activity: Water Evaporation
How long does it take for water to evaporate?
Activity best for children age 2 and up
Have you ever wondered what happens to a puddle of water on a hot day? Where does the water go? Water is a liquid and when it gets heated up it turns into a gas and evaporates into the air. Sometimes you can see the gas, like when you see the steam from a boiling tea kettle. Most of the time you can’t see the evaporation process, but you can track how long it takes! This fun outdoor experiment lets you measure how long water takes to evaporate.
Will the different sizes of the containers make a difference in the time it takes the water to evaporate? If it is a super hot day will the water evaporate faster than on a cooler day? What happens if you put the containers of water in the shade? What happens if you cover the containers with different types of materials? Will your predictions be the same as the results? Have a grown up help you gather the items you need and get ready to be an environmental scientist!
Materials you’ll need:
Different size lids from recycled materials (deep, shallow, large, small, etc.)
Measuring spoon
A piece of tin foil
A piece of plastic or bubble wrap
A mesh bag
Water
Pen and paper to write down your predictions and your results
Tray to place the lids on
Guiding Questions:
Which size lid had the water evaporate in the fastest time? The longest time?
Predict (guess) how long it will take for the water to evaporate – 5 mins, 2 hours, 1 day?
What happens if you cover the lid with plastic, foil or a mesh bag? Make a prediction! Do you think it will make the water evaporate faster or slower?
Put the lids in the shade. Does this affect the evaporation time? Make it slower, faster?
Did the material of the lid make a difference in how long it took the water to evaporate?
The next time it rains guess how long it will take for the puddles to dry.
Directions
STEP 1
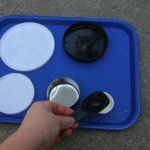
With the help of a grown up, gather some lids from different containers that you have in your house. You will also need a measuring spoon to measure the same amount of water that you will put in each lid.

STEP 2
Place the lids you are going to use on a tray outside. Start with a sunny spot. Add 1 tablespoon of water to each lid.
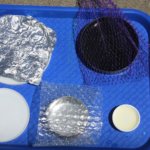
STEP 3
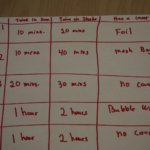
Cover some of the lids with the different materials your grown up helped you find like foil, plastic, and mesh. Leave some lids uncovered. Predict how long it will take for the water to evaporate. You can write that down on a piece of paper.
STEP 4
Keep checking on the lids. When the water has all gone that means it has evaporated back into the atmosphere. Try the experiment again this time placing the lids in the shade.
Grown ups, are you looking for more ways to extend your child’s learning? Check out these extension activities to build upon today’s STREAM activity!
Reading Connection
The Water Cycle at Work by Rebecca Olien
Science Connections
Place different size containers of water in the freezer and observe how long it takes each one to freeze into a solid. Does the water in a smaller, shallow container freeze faster than water in a bigger, deeper container? After you observe how long it takes the water to freeze, you can then place the ice on a tray and place it outside in the sun to observe how long it takes to melt back into water!
Share your experiments with us on Instagram by tagging @sdcdm320!
Questions about this activity? Email education@sdcdm.org