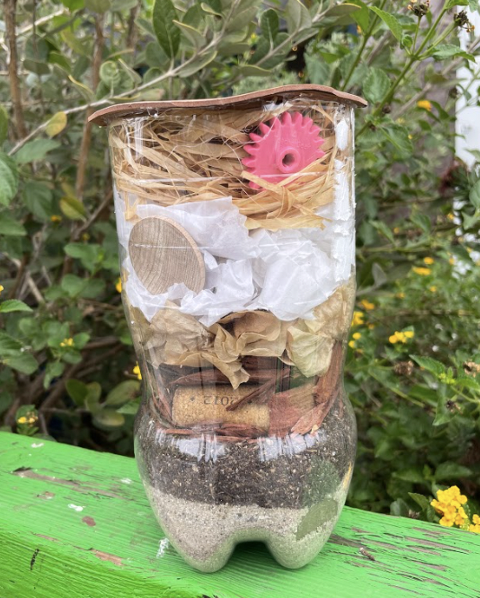
STREAM Activity: Layered Mineral Bottle
How many layers do you see in your bottle?
Activity best for children ages 2 and up
Whenever you go outside, what are some things you usually see? Flowers? Trees? Dirt? There’s a lot of wonderful things that we can find outside. Living on planet earth, we can discover a lot of natural resources and materials. Plants are a good example of a natural resource because they come from nature itself– people cannot build plants the same way we can build cars or machines. Another good example of a natural resource are rocks and minerals. The rocks you find outside also come from the earth and can be turned into something new, like materials to build robots and machines! We can find different rocks and minerals when searching different levels of the earth. Today, we are going to be making our very own Mineral Bottle with things we can find both inside and outside of our home. We’ll get to make our own layers and add our own special “minerals”!
Materials:
Clear 2-liter bottle/clear container (vase, jar, etc)
6 different filling materials (soil, leaves, paper, etc)
6 small objects or toys
Cardboard/cardstock/paper
Scissors/box cutter
Glue gun
Guiding Questions:
Can you spot 3 things outside that were made from the earth?
Try to find 3 different rocks outside. What makes them different?
Directions
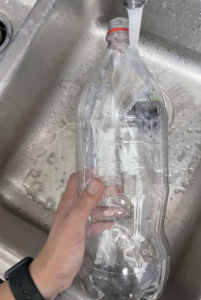
Step 1
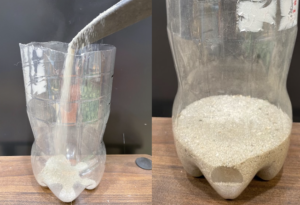
Wash your bottle thoroughly. You can also use any clear container if you don’t have a bottle.
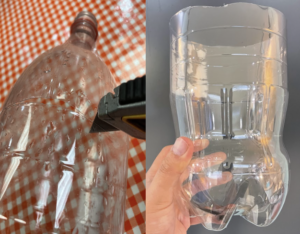
Step 2
Have a grown-up cut the top of the bottle with a box cutter. Try to line it up with the lines on the bottle.
*Don’t forget to wipe down the inside of the bottle so that it isn’t wet.
Step 3
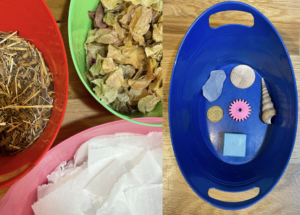
Explore inside and outside of your home for fun filling materials that will be filling the inside of your Mineral Bottle.
Also gather the small objects that you want to include in each layer. These are going to be our “special minerals”!
Step 4
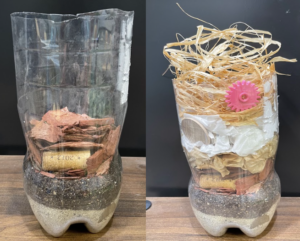
Start by filling a small portion of your first layer with your first filling material. Then place your small object inside and against the wall of the bottle. Finish the first layer by adding the rest of your filling.
Be careful not to bury it completely! It should be hugging the wall of your bottle and still be visible.
Step 5
Repeat Step 4 until all your layers are complete.
Step 6
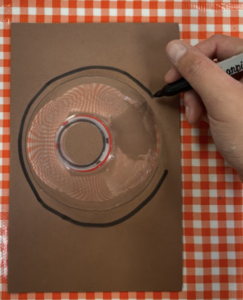
Take the bottle top that you cut earlier and place it on your piece of paper or cardboard. Trace around it and cut it out.
This will act as the lid to keep your fillings inside from moving around and spilling.
Step 7
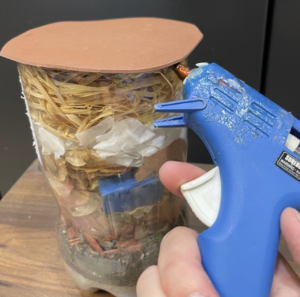
Lastly, have an adult glue down the lid using a hot glue gun. You can also use super glue or tape.
Grown Ups-Are you looking for more ways to extend your child’s learning? Check out these extension activities to build upon today’s STREAM activity!
Reading Connections
The Rock Factory: A Story About the Rock Cycle by Jacqui Bailey and Matthew Lilly
Science Connections
Studying rocks can teach us a lot about the history of the earth, especially when we want to learn more about what the earth was like hundreds and thousands of years ago. People who study rocks are called Geologists and their job is extremely important for us to learn more about the earth!
Real World Connections
The earth has many amazing rocks, minerals and natural resources that are used every day by different people all over the world. In the future, you might find a natural resource that could be turned into something else. Whether it be for play or to engineer something new!
Share your layered mineral bottle with us on Instagram by tagging @sdcdm320!
Questions about this activity? Email education@sdcdm.org