Daily STREAM Activity: Holiday Ice Lantern
Celebrate the holidays with an ice lantern!
Activity best for children age 4 and up
Get ready to become an engineer, a scientist, and an artist by making a winter holiday decoration all at once! Today we are going to freeze our engineered art creations to turn them into beautiful, illuminated (lit up) lanterns inspired by nature. First put on your engineer hat and decide what shape and size lantern you would like to make. You could make big lanterns by using big containers, like milk cartons, or you could go small by using individual serving yogurt containers. Then as a scientist think about how long you have to freeze your lantern. When water, a liquid, freezes it becomes a solid. Make a prediction (a guess) about how long it takes to freeze. As an artist, think about what kind of natural materials you would like in your ice lantern. Do you want to make a pattern, use different colors, have only leaves, or mix in some flowers? Time to get creative and have fun making winter holiday ice lanterns!
Materials you’ll need:
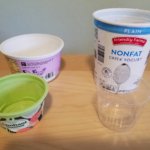
Containers of various shapes and sizes.
Safe nature materials like berries, leaves, flowers
Water
Freezer
Small battery operated tea light
Guiding Questions:
What will happen when I put the water in the freezer? Does the water change? How does it change?
What happens to the nature materials that I use? Did they change when they got frozen?
How does the ice lantern feel?
Can ice stay out of the freezer? How long did it take for the ice lantern to melt?
Directions
STEP 1
Gather natural materials that are safe.

STEP 2
With the help of a grown-up, gather different sized containers. TIP: Choose different sizes that can fit inside one another.

STEP 3
Place the nature materials on a tray to see what you have. Think about what will look interesting once it is frozen in ice.

STEP 4
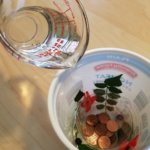
Place a smaller container into a big container and to hold it in place weigh it down with some coins. You can use a stick, like a chopstick or popsicle, to help you place the nature materials around the outside of this small container.

STEP 5
Pour some water slowly into the outside container. (Try not to get water in the small container that has the coins). Now carefully place it in the freezer. After about an hour, slowly add more water if needed.

STEP 6
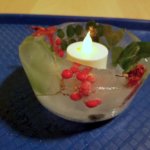
Once the ice is fully frozen, take the small container out from the middle. You can pour some room temp water over the containers to loosen the ice. You should have a hollow space or the flameless candle to fit.

STEP 7
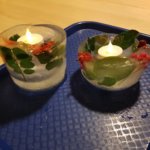
Now take the ice out of the large container. Place your ice lantern on a tray or plate so that as it melts it does not get anything wet. Turn on the flameless candle and enjoy your winter holiday ice lantern!

Grown ups, are you looking for more ways to extend your child’s learning? Check out these extension activities to build upon today’s STREAM activity!
Reading Connection
December Holidays from Around the World by Baby Professor

Learn about the different winter holidays that are celebrated around the world.
Share your ice lanterns with us on Instagram by tagging @sdcdm320!
Questions about this activity? Email education@sdcdm.org

